

Prep and Cooking Time: 1hour 20min
Skill: Super Easy
Servings: 8 pieces
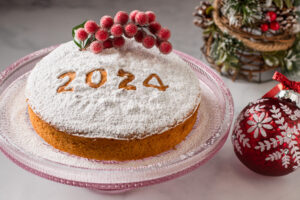
With all our Christmas Day baking done, it’s time to focus on the New Year’s festivities. It’s not New Year’s without a Vasilopitsa, which translates to St. Basil’s pie. This New Year’s bread or cake containing a hidden coin is served in Greece, Eastern Europe and the Balkans to celebrate and bless the coming of the New Year.
The story goes that St. Basil, Bishop of Caesaria (370AD – 379AD), asked the citizens of Caesaria to donate money and gold in an attempt to prevent the takeover of their city by the Roman Empire. They presented whatever they could and would rather live in poverty than under the rule of the Roman Empire. The Romans were so amazed by this unselfish act of giving that they completely forgot to attack Caesaria. St. Basil then thought to bake many, many loaves of bread and conceal the money and gold he received within each loaf and hand them out to the citizens of Caesaria. It’s then believed that by a miracle, every citizen received precisely what they gave!
Over the years, the vasilopita has evolved from a loaf of bread to a cake and even a pita. Today it depends on what part of Greece you’re from, my mother-in-law, from Florina, bakes a tiropita, and my aunt from Athens bakes a cake. In my home, we usually cut up to 3 vasilopites every New Year; one on New Year’s Eve, one at home on New Year’s Day and one on New Year’s Day at our family lunch/dinner.
Cutting the vasilopita does involve some ceremony. Usually, the host of the event/house cuts the vasilopita and names the recipient of each piece. First, the host says a prayer and scores the top of the cake with a cross. The first piece is for Jesus Christ, the second for the Virgin Mary, the third for the home and the fourth for the host. Then every slice after that is served to all the attendees, from the oldest down to the youngest. Whoever is lucky enough to get the coin will be blessed with extra good fortune in the coming year. There are many variations of how to cut a vasilopita; however, you can cut it up any way that feels right for your family.
This recipe comes from Maria Takas’ Yiayia Marika. Maria made this with gluten-free flour by replacing the 2 cups of pastry/cake flour with 1 3/4 cups of gluten-free 1-to-1 flour, she recommends Bobs Red Mill 1-to-1 Gluten Free Baking Flour. She made this vasilopita for me when we made our reel. I don’t eat many gluten-free cakes, but let me tell you, you couldn’t tell this was a gluten-free cake at all, and it was sooooo light and moist. It doesn’t happen often, but I was speechless lol!
If your schedule is super busy, you’re not a baker, or you just want to spend more time with family and friends this Holiday Season, we got you! Click here to preorder some Serano Bakery Vasilopites and any other goodies you may need this Christmas and New Year’s.

Things You’ll Need
• 8” round cake pan
• High speed mixer
• Zester
• Measuring cups and spoons
• Mixing Bowls
• Spatula
• Parchment Paper
• Scissors
• Pam Original Cooking Spray
• Numbers (paper or wooden)
• Winter Berries for decor (optional)
• Dime
• Aluminum Foil
Ingredients
• 1/2 cup unsalted Butter (softened)
• 1 cup Sugar
• 3 Eggs (separate yolks from whites)
• 1 cup Milk
• Zest of 1 Lemon
• 1/2 tsp Vanilla
• 3 tsp Baking Powder
• 2 cups Cake & Pastry Flour or 1 3/4 cups 1-to-1 Gluten Free Flour
• Icing Sugar (to decorate)
Instructions
1. Preheat oven to 325℉.
2. Sift together flour and baking powder and set aside.
3. With a mixer cream butter and sugar together.
4. With the mixer on low add egg yolks one at a time until combined.
5. Add vanilla, lemon zest and milk, continue to beat on medium high until well incorporated.
6. With the mixer on low slowly add the flour until the batter comes together.
7. In a separate bowl whisk together the egg whites until they are thick and fluffy.
8. Using a spatula fold egg whites into the cake batter until completely incorporated.
9. Pour mixture into a pre-greased baking pan.
10. Take a dime and wash it very carefully using hot soap and water. Then dry it and completely cover it using a small 1” square piece of aluminum foil.
11.Take the dime and lightly dredge it in a bowl of flour, then place it into the cake batter.
12.Bake at 325℉ for 60 minutes.
13.Remove from oven and let cool.
14.Place cake on a serving plate/cake stand.
15.Use cut out 2023 numbers (you can cut them out of paper yourself or use wooden ones, we found ours at our local craft store) and place on top of the cake and generously sprinkle with icing sugar until completely covered. Remove numbers and decorate with Christmas berries.
Notes: We’ve halved the original recipe because we used a small 8″ round aluminum cake pan that serves eight pieces of cake, but if you require a larger cake, go ahead and double it. Bake at 350℉ for 60 minutes.
Tips: We found that whipping the egg whites separately and then folding them into the cake batter made this cake really fluffy and very moist.
Merry Christmas and Happy New Year!!!